For my technical publications clients, I use a true desktop Publisher (Framemaker) to produce standalone documentation or to single source to an Online Help standard output such as Microsoft HTML 1.x help; however, many of my clients, for their own internal documentation, use Microsoft Word. Because I am a writer, they naturally assume that I know many things about many different tools, and reach out to me for help, in particular, Microsoft Word and numbering. I could write pages and pages about all the issues with numbering Microsoft Word, and I know that we all have felt the pain of opening a document having all the numbering and bulleted lists go to heck in a hand basket for no apparent reason other than “it’s what MS Word does.”
Sequence fields are a way of semi-automating the process of numbering in an MS Word document, and ensuring that you will have stable numbering and bulleted lists in MS Word documents that you produce. It also allows for easy updates of numbering when you insert or delete a paragraph in an MS Word document. I have offered this solution to many of my clients who have suffered the follies of numbering in MS Word and all have been happy and appreciative of the solution. I thought I would make it general knowledge and share it with anyone who chooses to read by blog. Hopefully, this will help alleviate some (but not all) of the suffering when working with an MS Word document.
P.S. This is written from the perspective of Word 2007, so some of the options might be found in different places and/or on different menus in different versions of Word, but once located, the steps are still the same.
TVB
1.) Open a blank Word document and click anywhere in the document.
2.) On the main menu, click Insert > Quick Parts > Field.
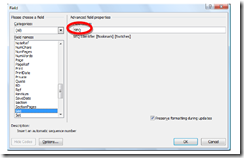
3.) In the Field dialog box, in the Field names list, select Seq. (Note how the Field codes field is automatically populated with the field code of Seq.)
4.) After the field of SEQ, enter the code for the field with the following information:
- The name of the field.
- The field type. (By default, unless otherwise specified, the field type is assumed to be a numbered field.)
- The starting number for the field, which indicates whether the field is to be a beginning field (for example, a “1” or an “a”), or a continuation field (for example, “2” or greater, or “b” or greater).
Here is an example of setting up a field code for a numbered list that is to begin with a “1″ where “numberlist” is the name of the list and the switch \r 1 indicates that the list is to be reset to “1.”
SEQ numberlist \r 1
- Note that there is a space between numberlist and the backslash and there is a space between the “r” and the “1.”
- It’s also important to note that I have named the field as “numberlist,” and by default, unless otherwise specified, Word assumes that the field code is to be used for a numbered list. You will see how to indicate an alphabetic list later in this lesson.
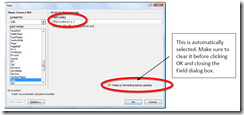
5.) Clear the Preserve formatting during updates option.
6.) Click OK and the number “1” is displayed where you clicked in the blank Word document.
7.) Select the “1” that is displayed, right-click it, and on the context menu that opens, select Toggle Field Codes to display and automatically select the field code for the number.
![]()
8.) After the last right curly bracket in the selected field code, type a period, press the Tab key, and then enter a space after the tab.
![]()
9.) Select all of the above code with the exception of the space. (Yes, this does mean select the tab character as well. This easiest way to select all but the space is to place the cursor at the beginning of the field code, hold down the Shift key, and then press the Right arrow key as needed until all but the tab is selected.)
![]()
10.) Open the AutoCorrect dialog box. (In Word 2007, this means clicking the Office 2007 button (which, to me, looks like an obnoxious knock-off of the Olympic Rings in the upper left corner of Word), and then clicking Word Options > Proofing > Autocorrect Options.)

11.) In the Replace field, enter the shorthand notation that you want to use for a paragraph that is to be numbered “1” in any of your Word documents. For example, in my Word installation, I entered 1], which is the number 1 followed by a right bracket ( ] ).
12.) Make sure that the option of Formatted text is selected.
13.) Click Add, and then click OK.
Now, every time that you want a paragraph to begin with a “1,” you need to simply enter a “1” followed by a right bracket “( ] ) and press Enter. The paragraph is numbered with a “1” that is followed by a period and a tab. You can then use Word Styles to change indent levels, and so on for different levels of numbered lists.
To repeat this procedure for continuation numbers for numberlist, make sure that the code for the continuation numbers is named identically– SEQ numberlist \n – where the \n is the switch that indicates to continue numbering the numberlist paragraph. (In my Word installation, I use a “2” followed by a right bracket ( ] ) to for my replacement text.)
For lower case alphabetic lists, I named the list “alphalist,” and the codes for lower case letters are as follows (noting that, unlike numbered lists, you must specify not only the switch, but also, that the numbered list type is to be a lower case alphabetic list. This requires the insertion of \* alphabetic between the list name of “alphalist” and the list switch of either \r 1 or \n).
- SEQ alphalist \* alphabetic \r 1
- SEQ alphalist \* alphabetic \n
For the replacement text, in my Word installation, I use a lower case “a” followed by a right bracket ( ] ) for the beginning letter “a” and I use a lower case “b” followed by a right bracket ( ] ) to indicate continue with “b” or greater.
For upper case alphabetic lists, the code for the numbered list type is Alphabetic (note the upper case “A.”) Also note that in the Auto Correct dialog box, a distinction is NOT made between upper case and lower case letters in the Replace field. For example, if you indicated that a] was to be used for the beginning lowercase “a,” you could not enter A] as the replacement text that is to be used for the beginning upper case letters. Word would automatically change the upper case A to a lower case a and you would wind up with two identical replacement codes to mean two different things and this simply won’t work! In my Word installation, I used an upper case A followed by a right curly bracket ( A} ) and an upper case B followed by a right curly bracket ( B} ) as my replacement text for upper case alphabetic lists.
Updating after you insert or delete a numbered paragraph is now easy and straight forward. If you insert or delete a numbered paragraph in a Word document, simply select any numbered paragraph in the list, right-click on the selected paragraph, and on the context menu that opens, click Update Field. The picture below illustrates this:
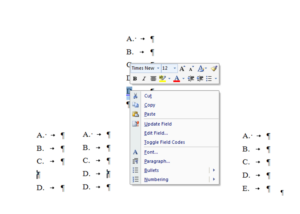
- I decided that I needed to insert a step between Step C and Step D.
- After insertion using the replacement code of B}, Step D was indeed inserted after Step C and what was the previous Step D.
- I select and right-click on what was the previous Step D, and on the context menu that opens, click Update Field.
- The previous Step D now becomes Step E as needed.